

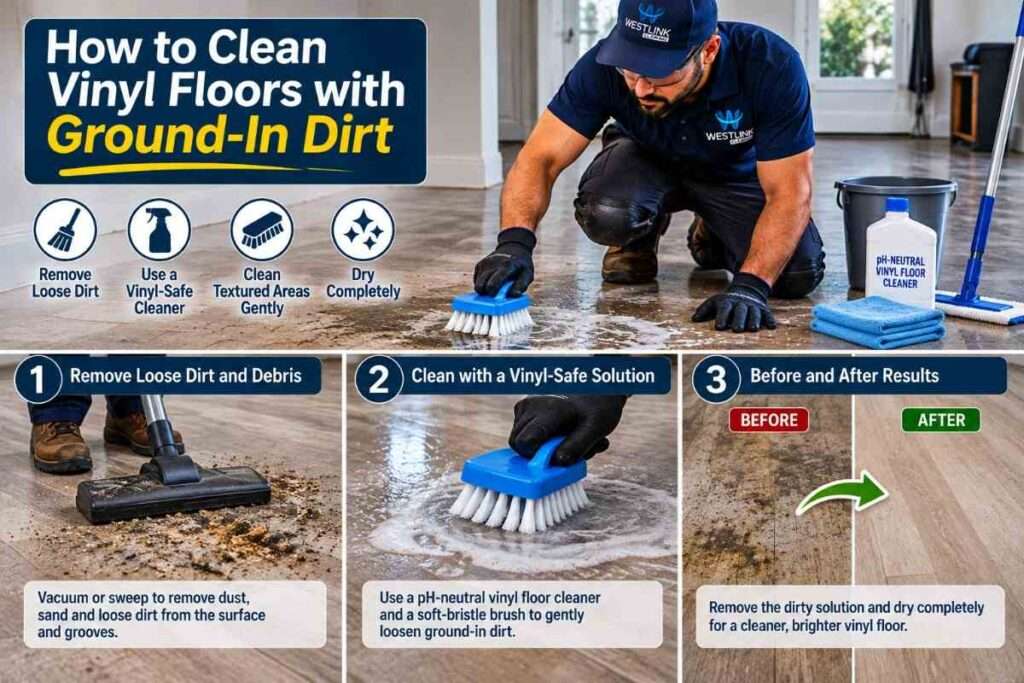
To clean vinyl floors with ground-in dirt, start by vacuuming loose grit, then apply a manufacturer-approved vinyl floor cleaner using a lightly damp microfiber mop. Gently loosen dirt trapped in textured areas with a soft nylon brush, remove the dirty solution, and dry the floor completely. Avoid excessive moisture, abrasive scrubbers, and unapproved chemicals that could damage the protective wear layer.
Ground-in dirt develops when dust, fine sand, cooking grease, and everyday soil become pressed into vinyl flooring through repeated foot traffic. Unlike loose surface dust, this contamination can remain in embossed patterns, narrow grooves, and heavily used walkways even after regular mopping.
Luxury vinyl plank (LVP), luxury vinyl tile (LVT), and sheet vinyl may all develop embedded surface grime, but their installation methods, textures, and care requirements can differ. The safest approach is to identify where the dirt has accumulated, choose a cleaner compatible with the flooring, and use controlled agitation rather than aggressive scrubbing.
This guide explains how to remove stubborn dirt from vinyl flooring, clean textured grooves, treat scuffs and stains, prevent recurring buildup, and recognise when professional cleaning may be necessary.
What Is the Best Way to Remove Ground-In Dirt from Vinyl Floors?
The best way to remove ground-in dirt from vinyl floors is to combine thorough dry cleaning, a vinyl-safe cleaning solution, gentle agitation, and complete removal of loosened soil.
Ordinary mopping may leave embedded dirt behind because the mop moves across raised surface areas without reaching shallow textures or recessed patterns. Adding more detergent or pressure does not necessarily solve the problem and may create additional residue or scratches.
For most modern vinyl floors, begin with a pH-neutral cleaner approved by the flooring manufacturer. Use a microfiber mop for general cleaning and a compatible soft-bristle brush for areas where dirt remains trapped.
The cleaning process should address three separate conditions:
-
Loose surface dirt: Dust, hair, sand, and crumbs that can be removed by sweeping or vacuuming.
-
Ground-in surface contamination: Dirt, oils, and cleaning residue held within embossed textures or traffic lanes.
-
Flooring damage or contamination beneath joints: Discolouration, lifting edges, or moisture problems that may not respond to surface cleaning.
If a small test area becomes visibly cleaner after gentle agitation, the problem is likely removable surface contamination. If the appearance remains unchanged, investigate the possibility of staining, coating deterioration, or installation damage before continuing.
What You Need Before Cleaning Vinyl Flooring
Using compatible cleaning equipment is essential because vinyl flooring commonly has a protective wear layer that can become scratched or affected by unsuitable products.
Prepare the following tools before starting:
| Cleaning tool or product | Purpose |
|---|---|
| Soft-bristle broom | Removes loose debris without aggressive abrasion |
| Hard-floor vacuum | Lifts dust and grit from seams, corners, and grooves |
| Microfiber mop | Applies cleaning solution using controlled moisture |
| pH-neutral vinyl floor cleaner | Loosens everyday dirt and compatible surface contamination |
| Soft nylon-bristle brush | Gently works embedded dirt out of embossed textures |
| Two cleaning buckets | Separates cleaning solution from rinse water when required |
| Microfiber cloths | Removes residue, dries edges, and treats small marks |
| Furniture sliders or protective pads | Helps move furniture without scratching the flooring |
| Protective gloves | Provides protection when required by cleaning-product instructions |
Choose a vacuum setting that disables aggressive rotating brush bars. Inspect mop pads and brush heads for embedded grit before using them.
Check the cleaner’s label for dilution instructions, suitable flooring types, and whether rinsing is required. Avoid assuming that all products advertised as multi-surface cleaners are compatible with every vinyl wear layer.
Before treating a large area, test the selected cleaner and tool on a small, inconspicuous section.
How to Clean Vinyl Floors with Ground-In Dirt Step by Step
The following five-step method focuses on removing embedded surface grime without excessive moisture or unnecessary abrasion.
Remove Furniture and Loose Debris
Begin by clearing movable furniture, rugs, entrance mats, and other obstacles from the cleaning area.
Lift lightweight items where practical. For heavier furniture, use suitable furniture sliders or protective equipment rather than dragging the legs directly across the vinyl.
Once the area is accessible, sweep or vacuum the floor thoroughly. Work slowly around room edges, skirting boards, furniture locations, and high-traffic pathways.
Use a vacuum crevice attachment along accessible plank joints and textured patterns where loose particles accumulate.
Do not use sharp tools to dig debris out of flooring seams. If material appears trapped beneath an edge, inspect the joint rather than forcing the cleaning attachment into it.
Dry cleaning is important because sand and other hard particles can become abrasive when dragged across the surface during damp mopping.
For heavily soiled entrances, remove accumulated debris from nearby mats so the floor does not become dirty immediately after cleaning.
Prepare a Vinyl-Safe Cleaning Solution
Choose a pH-neutral cleaning product specifically approved for your vinyl flooring, ideally one recommended by the floor manufacturer.
Follow the cleaner’s specified dilution ratio. Concentrated and ready-to-use formulas have different requirements, so avoid adding an arbitrary amount of liquid to a bucket.
Where dilution is required, use water at the temperature recommended by the product instructions. Room-temperature or mildly warm water is generally preferable to excessively hot water.
Avoid automatically mixing dish soap, vinegar, baking soda, or other household substances into the solution. These mixtures can leave residue or conflict with flooring care recommendations.
Some floor manufacturers specifically advise against detergent-based products, even when diluted.
For additional information about household detergent compatibility, see our guide on whether you can clean vinyl floors with dish soap. It explains the limitations of dish soap and why following flooring-specific cleaning guidance matters.
Prepare a separate supply of clean water if your chosen floor cleaner requires rinsing.
Apply Cleaner in Small Sections
Dip a clean microfiber mop into the cleaning solution and wring it out until damp rather than dripping.
Begin at the farthest end of the room and work toward the exit, cleaning one manageable section at a time.
Use overlapping strokes to distribute the cleaner evenly, paying additional attention to areas affected by cooking grease, foot traffic, or visible grime.
Allow the product to remain on the surface only for the contact time specified by its manufacturer. This gives the cleaning ingredients an opportunity to loosen attached dirt.
Do not flood the floor or allow cleaning solution to collect along plank edges, joints, skirting boards, or damaged sections.
Although many vinyl products are marketed as waterproof, the flooring installation, joints, adhesive, and underlying materials may have different moisture limitations.
If the mop becomes visibly dirty, rinse or replace the pad. Similarly, change the cleaning solution when it becomes heavily contaminated.
Reusing dirty water can redeposit the particles you are attempting to remove.
Gently Scrub Ground-In Dirt
When damp mopping does not remove embedded grime, use a soft nylon-bristle brush approved for the floor’s surface.
Start with a small test area. Apply the compatible cleaning solution, then gently agitate the affected section using short, controlled strokes.
For embossed or wood-look vinyl, begin by brushing along the surface pattern so the bristles can reach shallow recesses.
Avoid stiff brushes, abrasive pads, steel wool, and excessive downward pressure.
The objective is to loosen contamination held within the texture, not to remove or wear down the texture itself.
Focus on areas where embedded soil is common, including:
-
Kitchen walkways and spaces near cooking appliances
-
Entrances exposed to tracked-in dust and sand
-
Hallways with repeated foot traffic
-
Embossed wood-grain patterns
-
Recessed surface textures and micro-bevels
As the cleaner releases dirt, remove the contaminated liquid with a microfiber cloth or a suitable hard-floor extraction tool.
If a mark does not improve after an appropriate gentle treatment, stop scrubbing and reassess the cause. Some darkened areas result from staining or wear rather than removable dirt.
Remove Residue and Dry the Floor
After cleaning, remove the dirty solution completely.
If the floor cleaner requires rinsing, wipe the area with a clean, lightly damp microfiber mop using fresh water. Change the water whenever it becomes visibly contaminated.
Some approved vinyl cleaners are designed for no-rinse use. In those cases, follow the product instructions instead of automatically adding unnecessary moisture.
Pay attention to embossed areas, corners, and plank edges where remaining dirty solution can dry into a visible film.
Use a clean, dry microfiber mop or cloth to remove surface moisture, then allow the floor to dry fully before replacing rugs or resuming normal traffic.
Inspect the cleaned area under natural light.
A successful clean should remove the visible embedded soil without leaving the floor sticky, streaky, or unusually slippery.
However, cleaning cannot restore a scratched wear layer or reverse discolouration caused by permanent surface damage.
How to Clean Dirt Trapped in Vinyl Floor Grooves
To remove dirt trapped in vinyl floor grooves, vacuum along the surface pattern, apply a manufacturer-approved cleaner, gently agitate the grooves with a soft nylon brush, and immediately remove the loosened contamination.
Textured vinyl flooring often reproduces natural wood grain, stone patterns, or other embossed finishes. These shallow variations give the surface its appearance, but they can also collect fine dust and oily soil.
A flat mop may clean the raised parts of the flooring while leaving darker material inside the recessed pattern.
For better results, follow this targeted method:
-
Vacuum the textured area using a suitable hard-floor attachment.
-
Apply a small amount of approved vinyl cleaner.
-
Allow the product’s recommended contact time without letting it dry.
-
Brush gently along the embossed pattern.
-
Lift the dirty solution using a clean microfiber cloth or suitable extraction equipment.
-
Rinse only where directed and dry the surface.
A soft handheld brush offers greater control in small areas, while an appropriate long-handled brush may be more practical for larger surfaces.
Do not attempt to scrape deeply into decorative grooves or force water between planks. Dirt sitting inside the surface texture is different from contamination beneath a flooring joint.
If the main problem involves heavily embossed flooring, our guide to cleaning textured vinyl flooring explains routine maintenance and the cleaning challenges associated with non-smooth surfaces.
For a more specific look at recessed patterns and cleaning equipment, see how to clean grooves in vinyl floors.
Both resources expand on individual surface conditions without changing the basic principle: loosen the soil gently and remove it before the dirty solution dries.
Cleaning Different Types of Vinyl Flooring
Vinyl flooring is available in several constructions, and the cleaning method should account for both the finished surface and the installation system.
Luxury vinyl plank, luxury vinyl tile, and sheet vinyl may all be suitable for damp cleaning, but they can differ in joint design, adhesive systems, textures, and product-specific restrictions.
Luxury Vinyl Plank (LVP)
Luxury vinyl plank flooring commonly reproduces timber flooring using individual planks with a printed design and protective wear layer.
LVP may be installed as a floating click-lock system or as a glue-down product, depending on the construction.
For routine cleaning, remove dry grit using a soft broom or suitable vacuum, then damp-mop with an approved vinyl cleaner.
For ground-in dirt, use gentle agitation on the affected surface texture rather than vigorous scrubbing across the entire floor.
Avoid allowing cleaning liquid to pool along plank joints or damaged edges.
Many modern LVP products are designed to resist everyday spills, but standing water can still create problems where joints are damaged, installation conditions are unsuitable, or moisture reaches vulnerable adjacent materials.
Do not apply wax or shine-restoring polish to modern no-wax LVP unless the flooring manufacturer expressly specifies an appropriate treatment.
Luxury Vinyl Tile (LVT)
Luxury vinyl tile is commonly manufactured in tile-shaped formats that imitate stone, ceramic, or other hard surfaces.
LVT often has a polyurethane-based protective surface, although construction and treatment vary between products.
Start with dry dust removal, followed by a compatible pH-neutral cleaner and a lightly damp microfiber mop.
Pay attention to any embossed surface pattern, bevelled edges, or grout-effect joints that may collect dirt.
If the flooring includes actual grouted joints, identify the grout material before selecting a cleaner or brush.
For installations with separate tiles or planks, avoid flooding joints. Heavy scrubbing and aggressive chemical products can affect surface treatments or leave visible wear patterns.
Use a stain-specific treatment only where the flooring manufacturer approves it.
Sheet Vinyl and Embossed Vinyl
Sheet vinyl is supplied in continuous rolls and may have fewer exposed flooring joints than individual planks or tiles.
However, seams, perimeters, damaged edges, and adhesive conditions still require moisture control.
Some sheet vinyl floors have smooth finishes, while others include embossed patterns that retain soil.
For smooth sheet vinyl, a clean microfiber mop and appropriate cleaner are often sufficient for routine maintenance.
For embossed surfaces, supplement damp mopping with a suitable soft brush when ground-in dirt remains.
Older sheet vinyl may also have different finish and maintenance requirements from modern no-wax LVP. Do not assume that stripping, waxing, polishing, or machine buffing is suitable without identifying the flooring product.
Very old or unidentified resilient flooring may require professional assessment before aggressive cleaning, especially when damaged materials or historical floor coverings could be disturbed.
| Flooring type | Common dirt-collection area | Main cleaning consideration |
|---|---|---|
| LVP | Wood-look texture, plank edges, traffic lanes | Protect the wear layer and control moisture at joints |
| LVT | Embossed surfaces, bevels, tile joints | Avoid inappropriate chemicals and excessive agitation |
| Smooth sheet vinyl | Traffic lanes, perimeter edges, residues | Use compatible low-moisture maintenance |
| Embossed sheet vinyl | Recessed surface patterns | Use gentle targeted brushing and residue removal |
How to Remove Stubborn Stains and Scuff Marks
Stubborn stains and scuff marks should be treated according to their source rather than using one strong cleaning product on every mark.
Ground-in soil, transferred rubber, cooking grease, ink, and permanent discolouration can look similar but may respond differently.
Always begin with the least aggressive compatible method.
| Mark or stain | Recommended starting method |
|---|---|
| Black footwear scuffs | Clean microfiber cloth and manufacturer-approved spot treatment |
| Cooking grease | Vinyl-compatible cleaner suitable for oily contamination |
| Sticky food spills | Soften using approved cleaner and wipe with a non-abrasive cloth |
| Mud and tracked-in dirt | Remove dry particles before targeted damp cleaning |
| Ink or dye marks | Check the flooring manufacturer’s approved stain-removal instructions |
| Gum or wax residue | Use a manufacturer-approved removal method without sharp scraping |
| Persistent yellowing | Investigate chemical staining, backing materials, or floor damage |
For light scuffs, gently wipe the affected area with a compatible cleaner. Avoid immediately using melamine foam, coarse pads, or solvent-based products.
Certain manufacturers permit limited use of isopropyl alcohol for specific stains, but this is not universal approval for every vinyl floor.
Use a specialist stain remover or solvent only where explicitly permitted by the flooring manufacturer’s instructions. Test first and follow the product’s safety requirements.
Avoid using WD-40, cooking oils, or improvised lubricants as general scuff removers. They may create slippery residue and require further cleaning.
Similarly, do not assume that baking soda paste is harmless simply because it is commonly described as a natural cleaner. Abrasive particles can affect certain surface finishes.
If staining remains after an approved treatment, repeated scrubbing can increase damage without removing the original mark.
Why Does Vinyl Flooring Still Look Dirty After Cleaning?
Vinyl flooring can continue to look dirty after cleaning because of residual detergent, embedded soil, greasy contamination, worn surface texture, or permanent staining.
The first step is identifying whether the problem is removable dirt or a change in the floor’s condition.
| Visible problem | Possible cause | Recommended response |
|---|---|---|
| Dark grooves | Dirt trapped in embossed texture | Gentle brush cleaning with an approved product |
| Cloudy appearance | Cleaner residue or surface film | Remove residue according to product instructions |
| Sticky patches | Excess detergent or incompatible treatment | Use an approved residue-removal approach |
| Dark traffic lanes | Embedded soil or accumulated wear | Clean a test area and compare |
| Black streaks | Footwear scuffs or transferred material | Use a compatible spot-treatment method |
| Yellowing | Material discolouration or chemical interaction | Investigate the cause before treatment |
| Raised or curling edges | Installation, adhesive, or moisture problem | Stop wet cleaning and seek assessment |
| Persistent dullness | Coating deterioration or surface abrasion | Assess whether cleaning can improve the condition |
A useful diagnostic approach is to clean a small, inconspicuous section using the correct product and compare it with the untreated floor once both areas are completely dry.
If the test area improves, the problem may be surface contamination.
If the colour or sheen remains unchanged, aggressive cleaning is unlikely to produce a better result.
Also consider whether the floor has previously been treated with wax, polish, or other coatings. Some older resilient floors require specialist maintenance, while many modern no-wax vinyl products should not receive these treatments at all.
The goal is to identify the cause before escalating the cleaning method.
Cleaning Products and Methods to Avoid
Avoid cleaning methods that can scratch the vinyl’s protective surface, leave stubborn residue, introduce excess moisture, or conflict with the manufacturer’s care instructions.
Vinegar and acidic DIY mixtures: Some manufacturers explicitly advise against vinegar because of potential effects on the flooring’s finish. Do not use it as a general cleaning recommendation.
Excessive dish soap and detergent: Soap can leave a sticky film that attracts dirt. Certain LVP manufacturers recommend avoiding detergent-based products entirely.
Abrasive powders and rough scrubbing pads: Baking soda powder, steel wool, stiff brushes, and aggressive pads can damage susceptible surfaces.
Wax and shine-enhancing products: Modern no-wax vinyl floors generally do not require polishing products. Incompatible coatings may form layers that collect dirt.
Unapproved bleach or ammonia cleaners: These can be unsuitable for some vinyl products and should not be used without explicit manufacturer approval.
Excessive water: Avoid flooding the floor, especially near joints, damaged edges, perimeter gaps, or vulnerable subfloor materials.
Steam mops: Manufacturer recommendations vary by product. Do not use steam equipment unless the exact flooring product explicitly permits it.
Strong solvents and improvised stain removers: Acetone, paint thinners, and uncontrolled solvent treatments can affect certain finishes. Only use specifically approved treatments.
Mixing cleaning chemicals: Never combine bleach with ammonia or acidic cleaning products. Follow the product label and relevant safety directions.
For routine maintenance, the safest starting point is a clean microfiber mop, controlled moisture, and a product specifically approved for the flooring.
How to Prevent Ground-In Dirt on Vinyl Floors
Preventing soil from becoming embedded is usually easier than removing it after repeated foot traffic has pressed it into the flooring texture.
A consistent maintenance routine helps protect the wear layer, reduce cleaning residue, and limit the need for more intensive scrubbing.
Practical prevention habits
-
Place suitable entrance mats at exterior doors to capture grit before it reaches the floor.
-
Sweep or vacuum high-traffic areas frequently, particularly entrances, kitchens, and hallways.
-
Remove spills promptly before they become sticky or attract dust.
-
Use protective furniture pads and lift heavy objects rather than dragging them.
-
Keep microfiber pads, vacuum attachments, and brushes clean.
-
Use compatible cleaners at the recommended concentration.
-
Avoid excessive wet mopping, especially around joints and edges.
-
Inspect recurring dark marks or unusual discolouration before attempting stronger treatment.
Recommended Vinyl Floor Maintenance Schedule
| Frequency | Cleaning task |
|---|---|
| Daily or as needed | Remove loose grit from busy entrances and walkways |
| After spills | Spot-clean and dry the affected area |
| Weekly or according to use | Damp-mop with an approved vinyl cleaner |
| When buildup appears | Targeted cleaning of textured areas and traffic lanes |
| Periodically | Inspect plank edges, seams, protective pads, and surface condition |
Cleaning frequency should reflect how the area is used. A commercial entrance exposed to outdoor debris may require daily attention, while a lightly used residential room may need less frequent wet cleaning.
Regular maintenance is especially important where vinyl flooring has pronounced texture. Fine grit retained in grooves can remain in contact with the wear layer during foot traffic.
For broader material-specific care principles, see our guide to how to clean vinyl flooring, which covers general routines and safe cleaning equipment.
When Does Vinyl Flooring Need Professional Cleaning?
Vinyl flooring may need professional cleaning when ground-in dirt remains after an appropriate DIY method, large areas contain embedded grime, or the floor’s condition makes further treatment difficult to assess.
Professional cleaning is particularly relevant for heavily used commercial floors, textured surfaces with widespread contamination, and flooring affected by recurring residue.
Consider seeking an assessment when:
-
Dark soil remains in grooves after compatible cleaning.
-
Traffic lanes appear uneven or heavily discoloured.
-
Sticky residue repeatedly returns after mopping.
-
Existing coatings or polish buildup require identification.
-
Large areas contain grease or embedded grime.
-
A floor has damaged joints, lifting edges, or unexplained staining.
-
Commercial maintenance requires specialist equipment or controlled access.
A professional cleaner may use compatible surface pre-treatment, controlled agitation, and extraction equipment to remove soil that domestic mopping cannot easily reach.
However, not all vinyl floors are suitable for machine buffing, stripping, sealing, or recoating. These treatments depend on flooring construction, protective finish, and manufacturer requirements.
Permanent wear-layer damage, installation failure, and discolouration beneath flooring materials may require repair or replacement rather than cleaning.
How Much Does Professional Vinyl Floor Cleaning Cost in Australia?
Professional vinyl floor cleaning costs vary according to floor area, soil levels, vinyl type, access, treatment requirements, and the service provider’s minimum charges.
As an indicative Australian 2026 market reference, published cost guidance lists A$3–A$6 per m² for vinyl/LVT cleaning and buffing, where the particular floor is suitable for that service. General hard-floor cleaning is also listed at approximately A$80–A$200 per visit.
Using the published per-square-metre range, illustrative area-based calculations are:
| Floor area | Indicative calculation |
|---|---|
| 20 m² | A$60–A$120 |
| 40 m² | A$120–A$240 |
| 60 m² | A$180–A$360 |
| 80 m² | A$240–A$480 |
| 100 m² | A$300–A$600 |
These calculations are not fixed service prices. Minimum booking fees can make small residential jobs cost more than a simple per-square-metre estimate. Specialist deep cleaning, heavy contamination, access restrictions, and additional treatments may also increase the price.
The published cleaning-and-buffing category should not be interpreted as recommending buffing for every LVP or LVT product.
For an accurate quotation, provide the cleaner with the flooring type, approximate floor area, condition, and details of the contamination. Ask whether the proposed treatment is compatible with the manufacturer’s care requirements.
For wider guidance on professional hard-floor cleaning methods, see our guide to professional hard floor cleaning services.
Frequently Asked Questions
What is the best cleaner for vinyl floors with ground-in dirt?
A manufacturer-approved pH-neutral vinyl floor cleaner is generally the best starting point. Apply it at the recommended dilution, allow the specified contact time, and gently remove embedded dirt with a compatible soft brush. Remove the dirty solution and dry the area afterward.
How do you get dirt out of textured vinyl flooring?
Vacuum the surface thoroughly, paying attention to embossed grooves. Apply an approved cleaner and use a soft nylon brush with light pressure to loosen trapped dirt. Remove the dirty solution before it dries and avoid excessive moisture around joints.
Can vinegar remove ground-in dirt from vinyl floors?
Vinegar is not recommended as a universal vinyl floor cleaner. Some flooring manufacturers prohibit acidic cleaners, including vinegar. Use the cleaning product specified by your flooring manufacturer instead.
Can you use baking soda to deep clean vinyl flooring?
Do not assume that baking soda paste is suitable for every vinyl finish. Baking soda has abrasive properties that may affect sensitive wear layers. Use an approved vinyl cleaner and non-abrasive equipment before considering specialist stain treatments.
Can a steam mop remove ground-in dirt from luxury vinyl plank flooring?
Steam mop compatibility depends on the exact flooring product. Some manufacturers prohibit steam cleaning, while certain specialised products allow it under specified conditions. Follow the care instructions for your floor instead of relying on general steam-cleaning advice.
Why does my vinyl floor still look dirty after mopping?
Residual cleaner, dirty mop water, trapped grime, and worn flooring surfaces can all cause a persistent dirty appearance. Clean a small test area with an approved product and inspect it after drying. If the appearance does not improve, the problem may not be removable dirt.
How often should I deep clean vinyl flooring?
Deep-clean when ordinary maintenance no longer removes visible soil or residue. High-traffic areas may need targeted attention more frequently than lightly used rooms. Avoid repeated aggressive cleaning when no significant buildup is present.
Can professional cleaning remove every stain from vinyl flooring?
No. Professional cleaning may remove embedded soil and compatible surface contamination, but permanent staining, wear-layer damage, yellowing, and installation problems are not always reversible through cleaning. Assessment is necessary before choosing a treatment.


